Tuesday, October 30, 2012

Pumpkins and Card Guards

Spent a few hours carving some pumpkins the other night and we decided to keep it Disney themed! Veronica carved Mickey and Minnie while I did the Hitch Hiking ghosts! Unfortunately our pumpkins rotted after only a single night!! That has never happened before, so this is the only pictures we will see of them :<( I was super bummed! We have two more pumpkins to carve, but after spending so much time and having them rot the next day we decided not to cut them!


To complete the centerpieces for the tables we decided on making card guards and using them for the table numbers! We have thirteen tables and one card guard each makes a total of 52! Wish we had planned it that way, but it just worked out! Hehe! Cut some spears out for the guards too... After cutting out all the letters for the Mad Hatter sign and having to cut 52 of these out and 104 shoes.. blah! Tedious, but that was the easy part! Painting them all is going to be the real challenge! 


Veronica's Birthday Present!

Veronica's birthday is on the 28th and it makes October even more exciting than it already is! :) We went and saw Frankenstein and Bride of Frankenstein at the Stanford theater and had a blast!


I also had to manage to come up with a birthday gift in the midst of all the Alice projects still going on! I decided on a mutual favorite attraction The Haunted Mansion and I remember some awesome themed Pins I've had my eyes on! They are a reproduction of the stretching room portraits with Mickey and gang instead of the normal paintings. I decided I would do the Donald and Daisy one first because I could tie our wedding date into the project!


I eventually want to make frames and the other three pins to make a complete set!

Wednesday, October 17, 2012

Flying Crank Ghost!

Since Halloween is going to be low key this year I am opting to keep my Pirates in the house! I was saving my flying crank ghost for next year and my Haunted Mansion theme, but I can't just not have a Halloween! Took less than ten minutes to hang from the ceiling and even though it does not meet my normal standards because you can clearly see the motor and linkage it does look neat at night!!


The unspoken eighth wonder of the world the BACKSIDE of a ghost! Ha.


Here is a short video!


Friday, October 12, 2012

Through the keyhole!


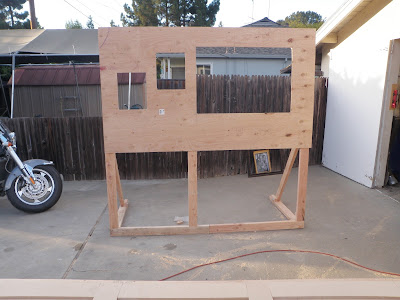
No rest for the wicked! Finished this free standing wall up in about three days! Still need to add detail to the door, hinges and wood board outlines and fix the curtains a bit, but hopefully everyone gets a kick out of this at the bridal shower! 

Sunday, October 7, 2012

Simply Impassible!

"Why, sometimes I've believed as many as six impossible things before breakfast." This quote struck a chord with me today because I went and started another humongous project with just a week before the bridal shower! We have been debating on a Photo Booth at the wedding, but the price is too prohibitive and we didn't really want to save money by having one of our friends take pictures all night, SO.. I starting browsing the endless realms known as Pintrest and found some DIY photo walls! I've been making everything dual purpose to use at the bridal shower and on our big day two months away so I figured I could try my hand at creating something that will work for both occasions. I immediately thought of a use for my Doorknob and he is going to fit well into this project! The bottom half of the wall is going to mimic the style and scene from the movie complete with brass rod and red curtains to hide the doorknob! The upper half is going to be "fabricated," but hopefully will not look out of place! I am not sure if I want to use fabric to cover the top half, or try and paint a scheme on.. I have no money and no time, so either solution is not good right now! Haha! I already have the frames and they are nothing special, but they do the job! To hide the seam from the top and the bottom I bought a piece of chair rail moulding that is going to make the project pop a little more! 


My trusty VW does it again! I am usually laid back and not in a rush, but I got stopped by no more than THREE separate people today while loading up my purchases to tell me their tales and adventures with their old VW's lol! I love hearing peoples attachments to old VW's because I love mine, but it was like the world was out to set out a colossal road block on me getting this project started!!

Friday, October 5, 2012

Tea Party chair numero uno!


After watching Alice in Wonderland a couple of times and noticing a tiny pattern in the first chair Alice sits in I decided I wanted to do something similar. I decided to free hand the design into the chair and forgo measurements and just eyeball everything. Still need to add some detail to the sides of the chair and maybe the seat.. We will see! Then onto my chair! No idea how I am going to paint it yet.. I have a ton of Black Lacquer spray paint that didn't work so well on my Pirates of the Caribbean plaque and I was thinking of giving that another shot! Stay Tuned!

Tuesday, October 2, 2012

Mad Tea Party Chairs

With only a few weeks until Veronica's Bridal shower I decided she needed a proper tea party chair for the occasion. I happened to be reorganizing a closet while looking for some tools and I stumbled across a box full of old wood related books. From making the ultimate workshop (circa 1963) to making authentic Quaker furniture and everything in between I took a moment from the task at hand and decided to browse through them. In a book called 'Making Country Furniture' I found a plan for a Poor Man's Wing Chair and it looked decidedly Alicey, so I decided to alter the plans and make the chair from one sheet of 3/4 inch 4X8 plywood!


I still need to finish the second coat of paint on this chair and in the movie there is a slight design to each tuck and roll area of the chair, so I am debating on whether I can pull off the complete paint scheme!


Normal size chair on the left! The backs are really tall!


I was only going to make one chair, but after seeing how the first one turned out I was given the green light to make a chair for me, so on our big day we will both be sitting in these over sized chairs! I decided to make a crown shape cutout on the side of my chair.. I wish I would have been at home to design something a little cleaner on the computer, but for freehanding this design on wood it didn't come out too shabby!


My car has been a workhorse for me this year! It has been able to handle getting the plywood sheets needed for all my projects and get the projects home once I am done in my Grandpa's garage!